Air Fryer Breaded Chicken Breast: Shatter Crisp
- Time:15 minutes active + 12 minutes cooking = 27 minutes total
- Flavor/Texture Hook: Shatter crisp exterior with a smoky, savory parmesan finish
- Perfect for: Quick weeknight dinners or budget-friendly meal prep
- Nailing the Best Air Fryer Breaded Chicken Breast
- Why This Crust Stays Crunchy
- Component Analysis and Pro Secrets
- Essential Pantry Staples and Substitutes
- Critical Kitchen Gear for Success
- Mastering the Multi Stage Coating Process
- Prevention Strategies for Breading Fails
- Scaling This Recipe for Crowds
- Debunking Common Air Fryer Beliefs
- Maximizing Longevity and Minimizing Waste
- Compelling Side Dish Combinations
- Recipe FAQs
- 📝 Recipe Card
Nailing the Best Air Fryer Breaded Chicken Breast
The first time I tried making breaded chicken in my air fryer, I expected a miracle but got a mouthful of dust. The breading was pale, the chicken was as tough as a hiking boot, and half the crumbs stayed stuck to the basket. It was a total kitchen disaster that almost made me give up on the appliance entirely.
But then I realized I was treating it like a standard oven instead of the high velocity wind machine it actually is. Once I figured out that panko needs a little "pretreatment" to brown and the chicken needs a physical pounding to stay tender, everything changed.
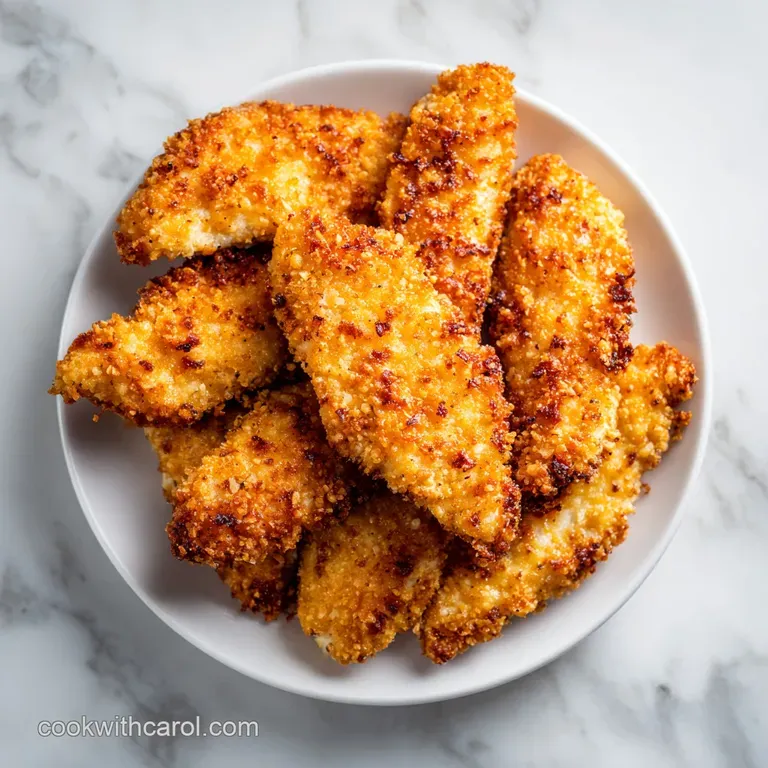
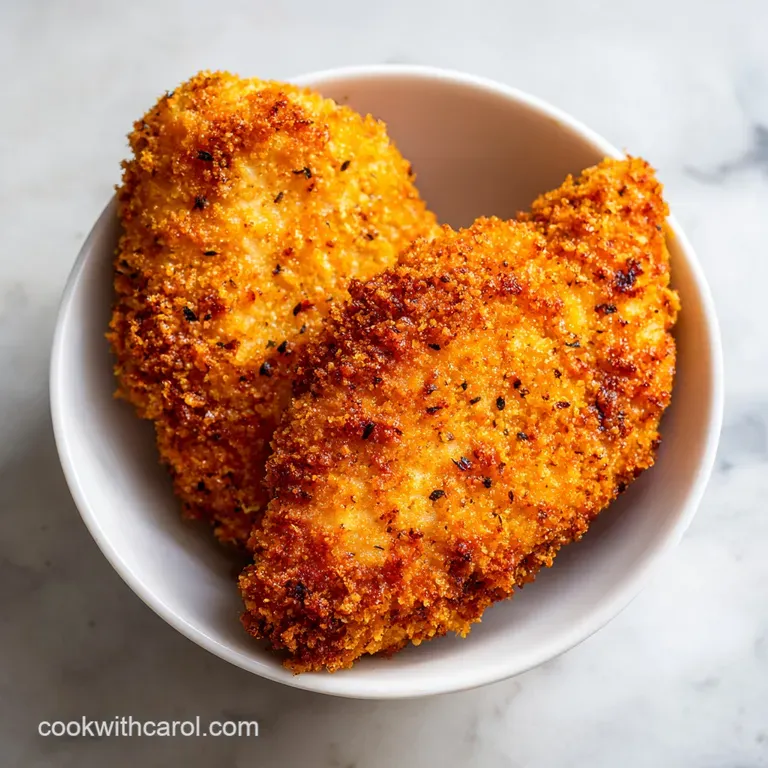
Now, when I pull a batch of this air fryer breaded chicken breast out of the basket, the sizzle is loud enough to hear from the next room. The crust has this gorgeous, uneven landscape of golden peaks and valleys that literally shatters when you bite into it.
Inside, the meat stays glistening and moist because we’ve protected it with a triple layer shield. It is the kind of meal that makes you feel like a kitchen genius, even on a Tuesday night when you're exhausted and just want something that tastes like a treat without the heavy grease of takeout.
We are going to focus on a few smart, budget friendly tricks today like using Dijon in the egg wash for extra "glue" and rubbing a tiny bit of oil directly into the crumbs. This ensures every single morsel of panko turns golden brown rather than staying that sad, chalky white.
You don't need fancy equipment or expensive cuts of meat; just a basic pound of chicken and a few pantry staples to get results that honestly put the local pub to shame.
Why This Crust Stays Crunchy
Understanding how the air fryer interacts with moisture is the secret to moving past soggy breading forever.
- Mechanical Tenderization: Pounding the meat to a uniform 1/2 inch thickness breaks down tough proteins and ensures the outside doesn't burn before the center reaches safety.
- Oil Rubbed Hydration: Mixing the oil directly into the panko ensures every crumb is coated in fat, allowing the hot air to "fry" the surface instantly.
- Dijon Adhesion: The vinegar and mustard solids in the egg wash create a stickier protein bond, preventing the breading from sliding off during the flip.
- Parmesan Crystallization: As the grated cheese heats, it melts and then hardens, acting as a savory mortar that holds the panko structure together.
| Thickness | Internal Temp | Rest Time | Visual Cue |
|---|---|---|---|
| 1/2 inch | 160°F (71°C) | 3-5 minutes | Golden crust with clear juices |
| 3/4 inch | 160°F (71°C) | 5 minutes | Firm to touch, no pink center |
| 1/4 inch (Cutlets) | 160°F (71°C) | 2 minutes | Deep brown, very snappy edges |
When you aim for that 1/2 inch thickness, you're creating the ideal ratio of surface area to volume. This allows the high speed fan to circulate heat efficiently around the entire piece of meat, resulting in a uniform cook that finishes in exactly 12 minutes without drying out the edges.
Component Analysis and Pro Secrets
| Ingredient | Science Role | Pro Secret |
|---|---|---|
| Panko Breadcrumbs | Provides high surface area for maximum air contact. | Rub with oil first to mimic the effects of deep frying. |
| Dijon Mustard | Acts as an emulsifier to thicken the egg wash. | Adds a sharp tang that cuts through the richness of the cheese. |
| Smoked Paprika | Adds color and deep wood fire aroma. | Helps the chicken look "fried" even in a short cook time. |
| Parmesan Cheese | Provides fat and protein for a structural "lattice." | Use the finely grated "powder" style for better coverage. |
Essential Pantry Staples and Substitutes
To make this recipe work on a budget, we’re using standard items you likely already have in the back of the cupboard. The 1 lb boneless skinless chicken breasts are the star here, but the supporting cast is what builds the flavor profile.
- 1 lb boneless skinless chicken breasts: The lean base for our dish. Why this? High protein, low-fat, and takes on seasonings beautifully.
- Substitute: Chicken thighs (increase cook time by 3 minutes).
- 60g all purpose flour: The "primer" that dries the chicken surface. Why this? Essential for making sure the egg wash doesn't slip off.
- Substitute: Cornstarch (results in an even crispier, thinner shell).
- 2 large eggs: The "glue" for our panko.
- Substitute: 1/2 cup buttermilk (adds a subtle tang).
- 15ml Dijon mustard: The flavor booster and thickener.
- Substitute: Yellow mustard (milder flavor but same sticking power).
- 5g garlic powder & 5g smoked paprika: Our aromatic heavy lifters.
- Substitute: Onion powder and chili powder for a Southwest vibe.
- 100g Panko breadcrumbs: For that signature air fryer breaded chicken breast crunch.
- Substitute: Crushed saltine crackers (yields a denser, buttery crust).
- 30g grated Parmesan cheese: For umami and structural integrity.
- Substitute: Pecorino Romano for a saltier, sharper kick.
- 15ml neutral oil (avocado or grapeseed): The browning agent.
- Substitute: Melted butter for a much richer, toasted flavor.
Critical Kitchen Gear for Success
You don't need a professional kitchen, but a few specific tools make the "shatter crisp" goal much easier to reach. First and foremost, you need a meat mallet. If you don't have one, a heavy rolling pin or even the bottom of a sturdy saucepan works in a pinch. The goal is evenness, not aggression.
You also need a three bowl setup for your dredging station. Using wide, shallow pasta bowls makes the "dry wet-dry" hand transition much cleaner.
Of course, the air fryer is the centerpiece. Whether you use a basket style Ninja air fryer breaded chicken breast or a toaster oven style, the mechanics remain the same. Just ensure your basket is clean; old grease can smoke at the 390°F (199°C) temperature we need for this cook.
Finally, an instant read meat thermometer is non negotiable. It’s the difference between "is it done?" and "it’s perfectly juicy."
Mastering the Multi Stage Coating Process
- Place chicken cutlets between sheets of plastic wrap. Use the flat side of a meat mallet to pound them to a uniform 1/2 inch thickness. Note: This ensures the chicken cooks at the same rate across the entire piece.
- Season both sides of the flattened chicken generously with salt and black pepper.
- Set up your dredging station. In Bowl 1, mix the flour with the garlic powder and smoked paprika until the color is a pale orange.
- In Bowl 2, whisk the eggs with the Dijon mustard until no streaks of yolk remain.
- In Bowl 3, combine the Panko, Parmesan, and oil. Use your fingers to rub the oil into the crumbs until they resemble damp sand.
- Dredge a cutlet in the flour, shaking off every bit of excess. You want a dusty coating, not a thick paste.
- Dip the floured chicken into the egg wash, ensuring every nook and cranny is wet.
- Press the chicken firmly into the Panko mixture. Flip and press again to ensure the crumbs are physically embedded in the egg wash.
- Preheat your air fryer to 390°F (199°C) for at least 3 minutes.
- Place cutlets in the basket in a single layer. Air fry for 6 minutes until the tops are starting to brown and sizzle.
- Flip the pieces carefully with tongs. Cook for another 5–6 minutes until the crust is deep golden and the internal temp is 160°F (71°C).
- Remove the chicken and let it rest on a wire rack for 3-5 minutes. Note: Carryover cooking will bring the internal temp to a safe 165°F (74°C) while the crust sets.
Prevention Strategies for Breading Fails
The most common frustration with breaded chicken in the air fryer is the breading simply flying off or staying soggy. It usually comes down to moisture management. If the chicken is too wet before the flour hits it, the flour turns into a slick film that slides off once the steam starts to escape during cooking.
Why Your Breading Is Soggy
If the bottom of your chicken feels wet while the top is crispy, it’s usually an airflow issue. The air fryer works by circulating hot air under the food. If you don't preheat the basket, the chicken starts cooking on a cold surface, which traps moisture.
Also, avoid using a parchment liner unless it has holes; otherwise, you're essentially steaming the bottom of your dinner.
Why the Breading Blew Off
High speed fans can literally lift light panko off the meat. This is why we rub oil into the crumbs and press them firmly into the egg wash. The oil makes the crumbs heavier and the "pressing" action creates a physical bond.
If you see "bald spots" on your chicken, you likely skipped the flour shaking step; too much flour prevents the egg from actually grabbing onto the meat.
| Problem | Root Cause | Solution |
|---|---|---|
| Pale, chalky crust | Lack of fat on the surface | Rub oil into the Panko before dredging |
| Breading falls off | Surface moisture or too much flour | Pat chicken dry and shake off excess flour |
| Dry, tough meat | Overcooking or uneven thickness | Pound to 1/2 inch and use a thermometer |
Common Mistakes Checklist
- ✓ Pat the chicken completely dry with paper towels before starting the flour dredge.
- ✓ Preheat the air fryer for a full 3-5 minutes to ensure the "sear" happens immediately.
- ✓ Never overlap the chicken in the basket; if they touch, the edges will be gummy.
- ✓ Use one hand for "dry" ingredients and one for "wet" to avoid "club hand" fingers.
- ✓ Let the chicken rest on a rack, not a flat plate, to keep the bottom from steaming.
Scaling This Recipe for Crowds
If you are cooking for a larger family, don't be tempted to cram all the chicken into one basket. Air fryers are essentially small convection ovens; they need space to breathe.
Scaling Up (Double the batch): When doubling this to 2 lbs of chicken, do not double the salt or spices linearly. Use about 1.5x the amount of salt to avoid an oversalted crust. You will need to work in batches.
Keep the first batch warm in a 200°F (90°C) oven on a wire rack while the second batch cooks. This keeps them crispy rather than letting them get soggy in a covered dish.
Scaling Down (Single serving): For a single breast, use one egg and halve the flour and panko measurements. The cook time remains the same at 12 minutes total, as the volume of a single piece doesn't significantly change the ambient temperature of the air fryer basket.
| Method | Time | Texture | Best For |
|---|---|---|---|
| Standard Air Fry | 12 minutes | Shatter crisp | Quick weeknight meals |
| Oven Baked | 22 minutes | Crunchy but drier | Large batches (10+ pieces) |
| Shallow Pan Fry | 8 minutes | Rich and buttery | Maximum flavor, more mess |
Debunking Common Air Fryer Beliefs
One big misconception is that you don't need any oil at all. While the air fryer uses significantly less than deep frying, a "naked" breadcrumb will never brown properly. The oil is the heat conductor that creates the chemical reaction needed for that golden color and toasted flavor.
Without it, you're just eating hot, dry bread.
Another myth is that you must flip the chicken halfway through. While most air fryers have great circulation, flipping is still essential for this specific recipe. Because the chicken is sitting on a metal grate, the contact points don't get the same airflow as the top.
Flipping ensures that the "sand like" panko and parmesan mixture crisps up evenly on both sides, giving you that uniform "fried" experience.
Maximizing Longevity and Minimizing Waste
Storage Guidelines: Keep leftover breaded chicken in an airtight container in the fridge for up to 3 days. To reheat, avoid the microwave at all costs it will turn your beautiful crust into a rubbery mess.
Instead, pop the chicken back into the air fryer at 350°F (180°C) for 3-4 minutes. This reactivates the fats in the breading and restores the crunch.
Zero Waste Tips: If you have leftover flour, egg wash, or panko, don't just toss them. You can use the remaining dredging station components to bread some sliced zucchini, mushrooms, or even thick onion rings for a quick side dish.
If you have chicken scraps from trimming the breasts, toss them in the breading too for "chef's treat" chicken nuggets that cook in about 6 minutes.
Compelling Side Dish Combinations
Since this air fryer breaded chicken breast is so savory and crispy, it pairs beautifully with high contrast sides. I personally love a bright, acidic lemon kale salad to cut through the richness of the parmesan crust.
The "Better Than Fast Food" combo is also a winner: serve this with some air-fried waffle fries and a side of honey mustard for a meal that feels like a weekend treat.
If you want something heartier, try a "Healthy Harvest Bowl." Slice the warm chicken over a bed of quinoa, roasted sweet potatoes, and a drizzle of tahini dressing. The crunch of the panko provides a necessary texture contrast to the soft grains and roasted veggies.
No matter how you serve it, this chicken is a versatile workhorse that makes leftovers something to actually look forward to.

Recipe FAQs
How long do you cook breaded chicken breast in the air fryer?
Cook for a total of 11 to 12 minutes. Air fry at 390°F for 6 minutes, flip the cutlets, and continue cooking for another 5 6 minutes until the internal temperature reaches 160°F.
Is air-fried chicken ok for diabetics?
Yes, it can be a suitable option when prepared correctly. Air frying uses significantly less oil than deep frying, and by using lean chicken breast, you reduce the overall fat content compared to traditional methods.
Is air-fried chicken good for cholesterol?
Yes, it is a heart healthier alternative to deep fried versions. Since air frying relies on hot air circulation rather than submersion in oil, you drastically lower the amount of unhealthy fats consumed while still achieving a crispy texture.
How do you cook chicken breast in panko bread crumbs in the air fryer?
Dredge the chicken in flour, then egg wash, and finally press into the Panko mixture. Combine 100g of Panko, 30g of Parmesan, and 15ml of oil until the crumbs feel like damp sand, then press firmly onto the cutlets to ensure full coverage before air frying at 390°F.
Is it true I must use high heat like 400°F for this chicken?
No, this is a common misconception. You should preheat and cook at 390°F (199°C) to ensure the Panko browns perfectly without burning the cheese or drying out the breast meat.
Why did my breading fall off the chicken during cooking?
Avoid skipping the step where you pat the chicken completely dry with paper towels. Excess surface moisture prevents the flour from sticking, which causes the entire breading layer to slide off once the air fryer fan starts circulating.
Should I stack the chicken to save space?
No, never overlap the chicken in the basket. The pieces must be in a single layer without touching so that the hot air can circulate around every side; if they touch, the edges will turn gummy instead of crispy.
Air Fryer Breaded Chicken Breast

Ingredients:
Instructions:
Nutrition Facts:
| Calories | 374 kcal |
|---|---|
| Protein | 35.2 g |
| Fat | 9.8 g |
| Carbs | 30.6 g |
| Fiber | 1.2 g |
| Sugar | 1.4 g |
| Sodium | 512 mg |
