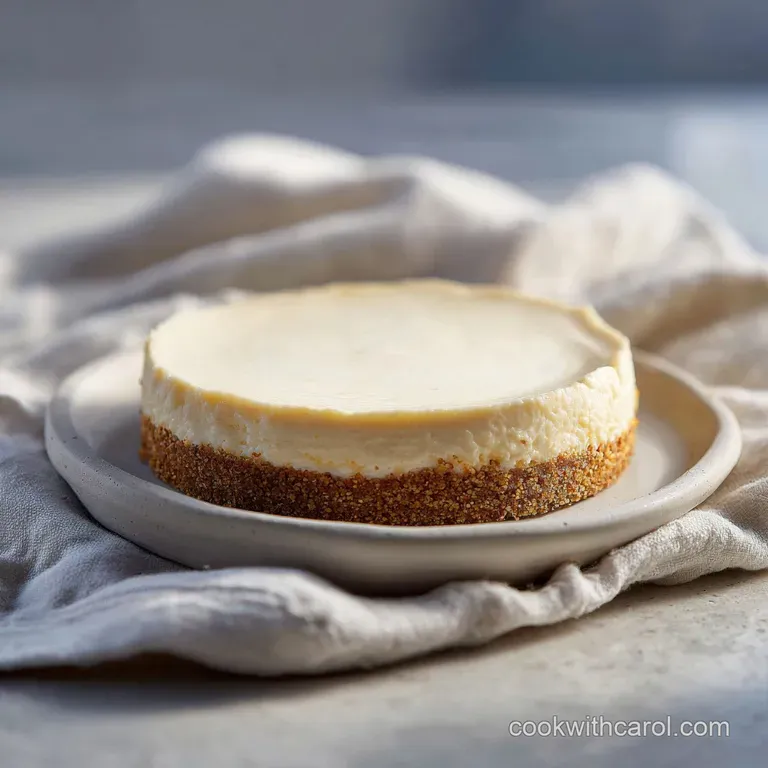
Simple No-Bake Cheesecake: Silky and Creamy
- Time:20 minutes active + 6 hours 20 minutes chilling = 6 hours 40 minutes total
- Flavor/Texture Hook: A buttery, honey kissed graham crust topped with a tangy, silky filling that melts instantly on the tongue.
- Perfect for: Summer dinner parties, beginner bakers, or anyone craving a decadent treat without heating up the kitchen.
- Mastering the Perfectly Simple Nobake Cheesecake
- The Secret to Velvety Stability
- Essential Recipe Performance Metrics
- Sourcing Your Premium Components
- Tools for a Smooth Filling
- Step-by-Step Construction Guide
- Solving Common Textural Issues
- Creative Flavor Profiles to Explore
- Storage and Sustainability Tips
- Ideal Pairings and Toppings
- Myths Regarding Nobake Desserts
- Recipe FAQs
- 📝 Recipe Card
Mastering the Perfectly Simple Nobake Cheesecake
Do you hear that? It is the distinct, muffled snap of a graham cracker sheet being pulverized in a zip top bag, followed by the intoxicating, toasted sugar aroma of crumbs meeting melted butter. I remember the first time I attempted a simple nobake cheesecake; it was for my sister's backyard graduation party.
I was so terrified it would turn into a puddle under the July sun that I over beaten the cream until it nearly became butter. We ate it anyway, but the texture was more like a dense spread than a dessert.
That day taught me that this dish isn't about brute force; it is about the gentle dance of aeration and temperature.
The beauty of a simple nobake cheesecake lies in its restraint. We are not hiding behind eggs or flour. Instead, we are relying on the structural integrity of cold fats and the chemical reaction between citrus and dairy.
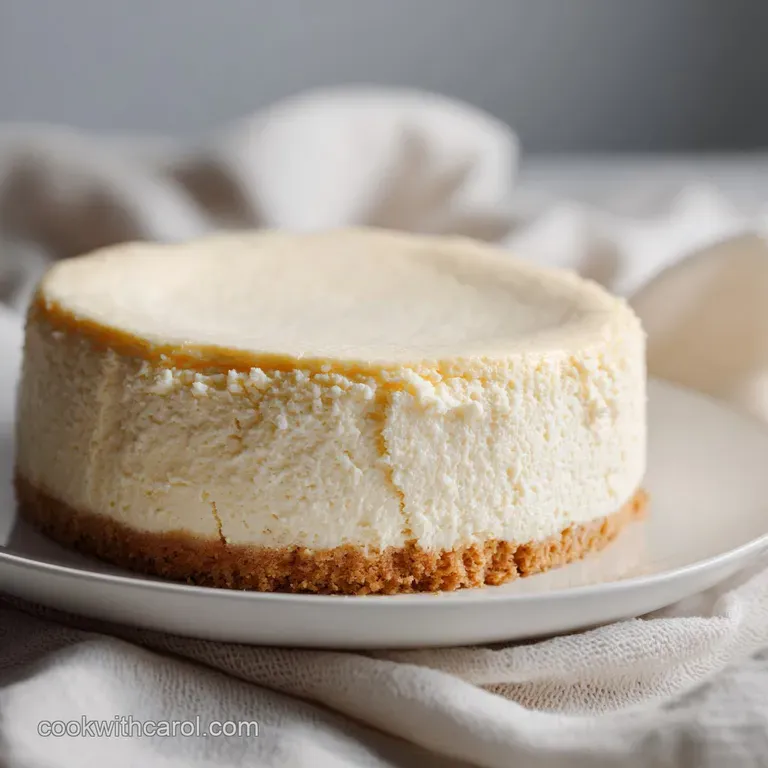
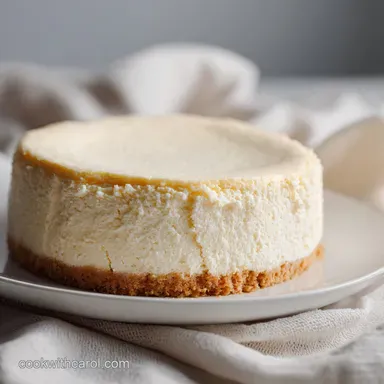
When you finally pull that springform latch and the sides fall away to reveal a clean, ivory white edge, there is a genuine sense of kitchen triumph. It is a quiet confidence, knowing that a few humble ingredients the kind you likely already have in your pantry can transform into something so elegant.
We are going to focus on getting that crust to a "shatter crisp" consistency while keeping the filling as light as a summer breeze. No rubbery textures here, just pure, creamy bliss. I’ve made every mistake possible with this one, from using "spreadable" cream cheese (a total disaster) to rushing the chill time.
Trust me, the wait is the hardest part, but it is also the most vital ingredient in the entire process.
The Secret to Velvety Stability
Acidic Tightening: The lemon juice reacts with the proteins in the cream cheese and Greek yogurt, causing them to firm up as they chill without needing heat.
Cold Aeration: Beating heavy cream creates a network of tiny air bubbles trapped in fat, which provides the "lift" and volume that makes the filling feel light rather than dense.
Thermal Setting: The saturated fats in the cream cheese and butter solidify at refrigerator temperatures, acting as the structural "glue" that allows for clean, sharp slices.
Moisture Migration: A brief freeze for the crust allows the honey and butter to create a moisture barrier, ensuring the base stays crunchy instead of absorbing liquid from the filling.
| Servings | Ingredient Adjustments | Pan Size | Total Time |
|---|---|---|---|
| 5 people | Halve all ingredients; use 1/2 egg yolk if scaling up | 6 inch round | 6 hours 20 mins |
| 10 people | Standard recipe (as listed below) | 9 inch springform | 6 hours 20 mins |
| 20 people | Double all ingredients; use 1.5x salt/spices | Two 9 inch pans | 6 hours 40 mins |
Finding the right balance between the richness of the cheese and the lightness of the yogurt is what sets this apart. While some recipes rely heavily on sugar, we are using honey to provide a floral depth that complements the tang of the Greek yogurt.
This combination ensures the dessert is refreshing rather than cloying, making it impossible to stop at just one sliver.
| Component | Science Role | Pro Secret |
|---|---|---|
| low-fat Cream Cheese | Provides the base structure and creamy mouthfeel through lactic fats. | Always use blocks, not the tub version, to ensure the water content is low enough to set. |
| Heavy Whipping Cream | Introduces air and stable fat globules for a light, mousse like texture. | Chill your bowl and beaters for 10 minutes to reach maximum volume faster. |
| Lemon Juice | Acts as a natural coagulant to help the dairy proteins firm up during the chill. | Freshly squeezed juice provides a brighter flavor and more active enzymes than bottled. |
Essential Recipe Performance Metrics
Before we start mixing, let’s talk about the reality of the timeline. A simple nobake cheesecake is the ultimate "slow fast" food. It takes almost no time to assemble, but the physics of the setting process cannot be rushed.
I once tried to serve this after only three hours in the fridge, and while the flavor was there, it slumped onto the plate like a sad cloud. Give it the full 6 hours 20 minutes.
The texture should be firm enough to resist a gentle poke but soft enough that a fork glides through with zero resistance. We are looking for a matte finish on top, not a glossy or wet look. If you see beads of moisture, your fridge might be a bit too humid a quick paper towel tent can help with that.
| Feature | Shortcut Version | Fresh Version (This Recipe) |
|---|---|---|
| Crust Texture | Greasy / Soft | Crisp / Shatter like |
| Filling Depth | Flat / Sugary | Complex / Tangy |
| Structural Hold | Often requires gelatin | Naturally set through fat/acid |
Sourcing Your Premium Components
- 1.5 cups graham cracker crumbs: Why this? Provides a classic, honey wheat base that contrasts the creamy top. Substitute: Crushed digestive biscuits or vanilla wafers.
- 3 tbsp unsalted butter, melted: Why this? The "cement" for your crust that solidifies when chilled. Substitute: Melted coconut oil (will add a slight coconut aroma).
- 1 tbsp honey (for crust): Why this? Adds chewiness and helps the crumbs stick together. Substitute: Maple syrup or agave nectar.
- 0.25 tsp sea salt: Why this? Sharpens the sweetness and cuts through the dairy richness. Substitute: Standard table salt (use slightly less).
- 16 oz low-fat cream cheese, softened: Why this? The structural heart of the filling with fewer calories. Substitute: Full fat cream cheese for an even richer result.
- 1 cup plain Greek yogurt: Why this? Adds a sophisticated tang and extra protein for stability. Substitute: Sour cream (slightly less firm result).
- 0.33 cup honey (for filling): Why this? A natural sweetener that blends better than granulated sugar. Substitute: Powdered sugar (for a more traditional flavor).
- 1 tbsp lemon juice: Why this? Essential for the chemical "set" of the dairy proteins. Substitute: Lime juice for a tropical twist.
- 1 tsp vanilla extract: Why this? Rounds out the flavors and adds a nostalgic aroma. Substitute: Vanilla bean paste for those beautiful black specks.
- 1 cup heavy whipping cream, cold: Why this? Provides the essential aeration and volume. Substitute: Pre whipped topping (note: this will be much sweeter).
Tools for a Smooth Filling
You don't need a professional kitchen, but a few specific items will make your life much easier. First, a 9 inch springform pan is non negotiable. Trying to dig a cheesecake out of a standard cake pan is a recipe for heartbreak. The removable sides are what give you that "wow" factor when serving.
An electric hand mixer or a stand mixer (like a KitchenAid) is highly recommended. While you could whisk the heavy cream by hand, it requires significant stamina and time. You also need an offset spatula to get that top perfectly smooth.
If you don't have one, the back of a large spoon works, but it's harder to get into the edges. Finally,, parchment paper is your best friend line the bottom of your pan to ensure the crust doesn't stick to the metal base.
step-by-step Construction Guide
- Prep the base. Combine the 1.5 cups graham crumbs, 3 tablespoons melted butter, 1 tablespoon honey, and 0.25 teaspoon salt in a medium bowl until it looks like wet sand. Note: If it’s too dry and doesn't hold when squeezed, add a teaspoon more butter.
- Compact the crust. Press the mixture firmly into the bottom of a 9 inch springform pan lined with parchment paper. Use the bottom of a flat glass to get an even, tight layer.
- Freeze the foundation. Place the pan in the freezer for 15 minutes. Freeze until the crust feels solid and cold to the touch. This prevents the filling from making the base soggy.
- Whip the cream. In a chilled bowl, beat the 1 cup heavy whipping cream on high speed. Cook until stiff peaks form and the cream stands up on its own. Place this in the fridge immediately.
- Cream the cheese. In a separate large bowl, beat the 16 oz softened cream cheese until it is completely smooth and free of any lumps. Note: This is the most important step for a velvety texture.
- Incorporate the flavors. Gradually mix in the 1 cup Greek yogurt, 0.33 cup honey, 1 tablespoon lemon juice, and 1 teaspoon vanilla. Beat until the mixture is uniform and shimmering.
- The gentle fold. Using a silicone spatula, gently fold the cold whipped cream into the cream cheese base. Use a "figure eight" motion to keep as much air as possible in the mixture.
- Smooth and fill. Pour the filling over the frozen crust. Use your offset spatula to smooth the top, starting from the center and pushing toward the edges.
- The final chill. Refrigerate for at least 6 hours. Wait until the center no longer jiggles when the pan is gently shaken.
- Release and serve. Run a thin knife around the edge of the pan before popping the springform latch. Slice with a hot, clean knife for the neatest presentation.
Solving Common Textural Issues
Why Your Cheesecake is Runny
If your filling doesn't hold its shape after the 6 hour chill, it usually comes down to the whipped cream or the temperature of the ingredients. If the heavy cream was only whipped to soft peaks, it lacks the structural "scaffolding" to hold up the heavier cream cheese.
Plus,, if the cream cheese was too warm when you folded in the cream, it can cause the air bubbles to collapse instantly.
Why Your Crust Falls Apart
A crumbly crust that won't stay together is often a sign of insufficient "tamping." You really have to put some muscle into pressing those crumbs down. Using the bottom of a measuring cup or a heavy glass ensures the butter and honey are forced into every crevice, creating a solid sheet once chilled.
If the crumbs are too dry, they won't bond; if they're too wet, they'll turn into a greasy paste.
| Problem | Root Cause | Solution |
|---|---|---|
| Lumpy Filling | Cream cheese was too cold when mixing. | Ensure cheese is room temp (sit out for 2 hrs) before beating. |
| Soggy Crust | Filling was poured onto a warm or room temp crust. | Always freeze the crust for 15 mins before adding the filling. |
| Grainy Texture | Honey or sugar didn't fully incorporate. | Beat the cream cheese and honey together for 2 full mins. |
Common Mistakes Checklist
- ✓ Never use "light" or "tub" cream cheese; the water content is too high for a firm set.
- ✓ Always use a cold bowl for whipping cream to reach maximum volume.
- ✓ Don't skip the lemon juice; the acidity is a functional ingredient for the "set."
- ✓ Resist the urge to peek; every time you open the fridge, you let out the cold air needed for setting.
- ✓ Pat your Greek yogurt with a paper towel if it looks watery before adding to the mix.
Creative Flavor Profiles to Explore
If you want to move beyond the classic vanilla, this simple nobake cheesecake is the perfect canvas for experimentation. One of my favorite variations is a "Berry Swirl." You can take a handful of raspberries, mash them with a little honey, strain out the seeds, and dollop the juice over the top of the filling before chilling.
Use a toothpick to swirl it into beautiful, marble like patterns.
For something a bit more decadent, try a "Mocha Twist." Add 1 tablespoon of unsweetened cocoa powder and 1 teaspoon of instant espresso powder to the cream cheese while beating. This creates a deep, sophisticated flavor that pairs beautifully with a chocolate cookie crust.
| Method | Time | Texture | Best For |
|---|---|---|---|
| Electric Mixer | 10 mins | Ultra aerated / Light | Maximum volume and "fluff" |
| Hand Whisking | 25 mins | Denser / Silky | Traditional, heavy set feel |
| Food Processor | 5 mins | Very smooth / Compact | Speed, but less air |
Storage and Sustainability Tips
Leftover cheesecake should always be stored in the refrigerator, tightly covered with plastic wrap or in an airtight container. It will stay fresh and delicious for up to 5 days. Interestingly, the flavor often deepens by day two as the honey and vanilla have more time to mingle with the dairy.
If the crust starts to soften slightly, it’s still perfectly edible, just less "shattery."
For long term storage, you can freeze this cheesecake! Wrap individual slices in parchment paper and then foil. They will last for up to 2 months. To serve, thaw in the fridge for 4 hours. Zero Waste Tip: If you have leftover graham cracker crumbs, don't toss them.
Toast them in a pan with a little cinnamon and use them as a "crunchy sand" topping for yogurt or oatmeal the next morning. If you have extra heavy cream, whip it up with a dash of vanilla for your morning coffee.
Ideal Pairings and Toppings
While this simple nobake cheesecake is a star on its own, the right topping can take it from a weekday treat to a dinner party centerpiece. Fresh berries blueberries, strawberries, or blackberries add a necessary burst of acidity that cuts through the richness.
I personally love a drizzle of warm honey and a sprinkle of toasted walnuts for a bit of textural contrast.
If you are feeling a bit adventurous, a spoonful of lemon curd or a dollop of salted caramel can add a whole new dimension. Since the base recipe is intentionally not too sweet, you have plenty of room to play with bold, sugary, or tart toppings.
Serve it with a crisp glass of Prosecco or a strong cup of Earl Grey tea to balance the creamy mouthfeel.
Myths Regarding Nobake Desserts
"No bake cheesecake is just pudding in a crust." This couldn't be further from the truth. While pudding relies on cornstarch or gelatin for its wobble, a properly made nobake cheesecake relies on the high fat content and protein structure of cream cheese.
The texture should be much denser and more substantial than any pudding you’ve ever had.
"You must use gelatin for it to stand up." Many people believe that without the "big G," a cheesecake will inevitably slump. However, as we’ve seen in this recipe, the combination of cold whipped fats and the tightening effect of citrus juice creates plenty of structural integrity.
In fact, skipping the gelatin often results in a superior, more natural mouthfeel that isn't "rubbery."
"Using low-fat ingredients will make it watery." This is only a myth if you use the right low-fat ingredients. While "fat free" cream cheese is a disaster for baking or setting, high-quality "low-fat" or Neufchâtel cheese actually has a very similar protein structure.
By balancing it with thick Greek yogurt, we maintain the density without the extra heavy lipids.

Recipe FAQs
How to make simple cheesecake no bake?
Combine graham crumbs, melted butter, honey, and salt to form the base, press it into a 9 inch pan, and freeze for 15 minutes. Separately, whip heavy cream to stiff peaks, blend softened cream cheese with Greek yogurt, honey, lemon juice, and vanilla, then fold the two mixtures together before chilling for at least 6 hours.
What are the ingredients in 3 ingredient cheesecake?
This recipe requires more than three ingredients to achieve the correct structure and flavor profile. You will need graham cracker crumbs, melted butter, honey, sea salt, cream cheese, Greek yogurt, lemon juice, vanilla extract, and heavy whipping cream.
Is cheesecake good for heart patients?
No, this is a common misconception. While this recipe uses low-fat cream cheese and Greek yogurt, it still contains dairy fat and honey, so it should be consumed in moderation as part of a balanced diet.
What is no-bake cheesecake filling made of?
The filling consists of softened low-fat cream cheese, Greek yogurt, honey, lemon juice, and vanilla. This mixture is lightened by folding in heavy whipping cream that has been beaten until stiff peaks form.
Can I freeze the cheesecake for longer storage?
Yes, you can freeze it for up to 2 months. Wrap individual slices tightly in parchment paper and foil, then thaw them in the refrigerator before serving.
How to ensure the crust holds together?
Press the mixture firmly into the pan using the bottom of a flat glass. If the mixture feels too dry and does not hold its shape when squeezed, add an extra teaspoon of melted butter to help bind the crumbs.
Is it necessary to refrigerate for the full 6 hours?
Yes, this time is essential for the proteins to set naturally. Attempting to slice the cheesecake before the full 6 hours may result in a filling that is too soft and does not hold its shape.
Simple No Bake Cheesecake
Ingredients:
Instructions:
Nutrition Facts:
| Calories | 328 kcal |
|---|---|
| Protein | 7.6 g |
| Fat | 21.2 g |
| Carbs | 28.4 g |
| Fiber | 0.5 g |
| Sugar | 18.2 g |
| Sodium | 288 mg |
