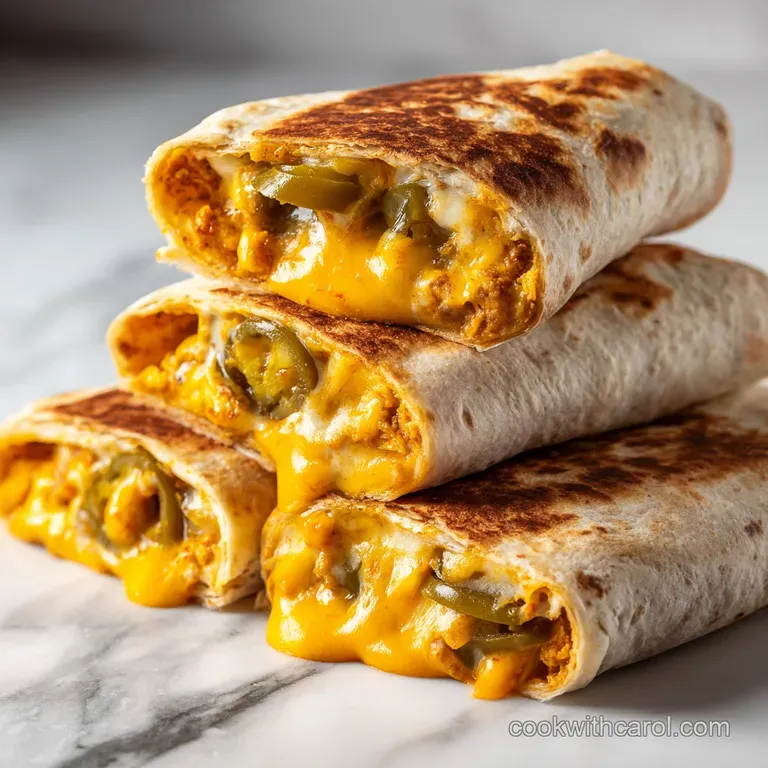
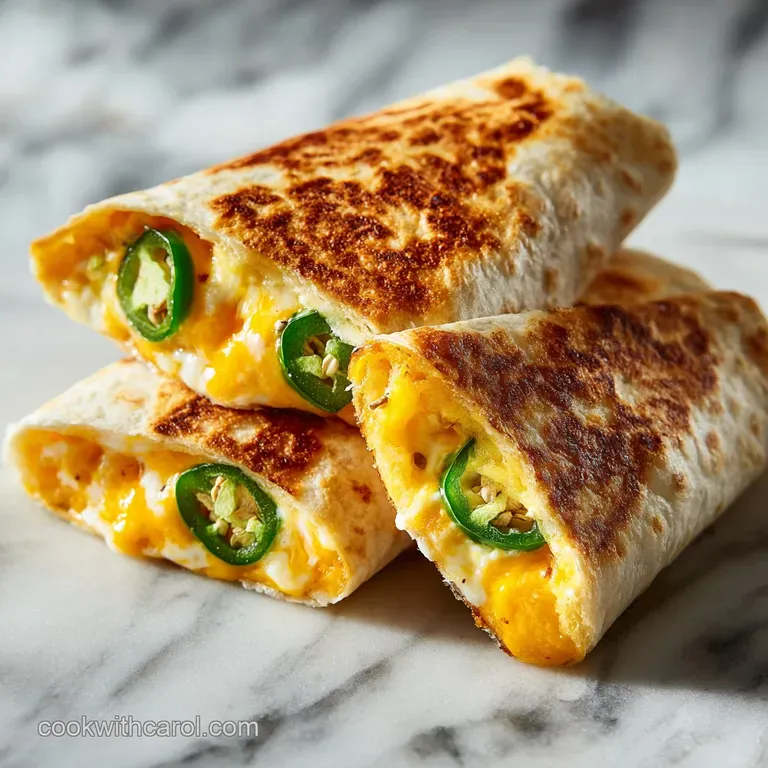
Chicken Popper Burritos: Cheesy and Crispy
- Time: 10 min active + 20 min cook = 30 min total
- Flavor/Texture Hook: Velvety melted cheese with a spicy kick and a mahogany colored, crispy shell
- Perfect for: Low effort weeknight dinner or high protein meal prep
That sound, right? The aggressive sizzle of a buttered skillet when the tortilla hits the heat is the best part of this whole process. I remember the first time I tried making "popper" style fillings for wraps.
I went the traditional route, trying to make a thick béchamel cheese sauce, and it was a total disaster. The filling was too runny, the tortillas turned into soggy napkins, and I spent an hour cleaning cheese off my stovetop. It was a mess.
The real trick is forgetting the fancy sauces. You don't need a roux or a professional grade emulsifier to get that creamy texture. Honestly, the simplest way is usually the best way. I discovered that using a softened block of cream cheese as the anchor for the filling changes everything.
It creates a thick, stable bond that holds the shredded chicken and jalapeños together without leaking, even when things get hot.
These Chicken Popper Burritos are basically the love child of a jalapeño popper and a classic mission style burrito. You're getting that hit of heat, the richness of the cheddar, and the convenience of rotisserie chicken.
Trust me on this, it's a budget friendly win that tastes like you spent all afternoon in the kitchen when you actually just threw things in a bowl and seared them.
Easy Chicken Popper Burritos
The beauty of this recipe is that it doesn't ask much from you. We're using rotisserie chicken, which is a massive shortcut. According to USDA FoodData, pre cooked chicken is a great way to maintain protein intake while cutting down on active cooking time. I've found that the seasoning already on a store-bought bird actually complements the smoked paprika and cumin perfectly.
The goal here is a contrast in textures. You want the outside of the tortilla to shatter when you bite into it, while the inside remains a velvety, molten blend of cheeses and spicy peppers. If you've ever had a burrito that felt like a steamed sponge, it's because it wasn't seared.
Searing isn't just for looks, it's for structural integrity.
Right then, let's get into why this actually works. We aren't just mixing ingredients; we're building a barrier. The fats in the cream cheese and cheddar create a protective layer around the rice and chicken, which keeps the tortilla from absorbing moisture from the inside. It's a simple fix for a common problem.
The Secret To The Texture
Since we're going for a "popper" vibe, the filling needs to be thick. If it's too thin, the burrito will leak. If it's too thick, it feels like eating a block of cold cheese. Here is how we balance that:
- Fat Barrier: The cream cheese acts as a stabilizer. It doesn't melt away as quickly as cheddar, meaning the filling stays thick even when it's piping hot.
- Steam Control: By using cooked, cooled cilantro lime rice, we avoid adding excess water to the wrap, which prevents the dreaded "soggy bottom."
- Seam Sealing: Placing the burrito seam side down in butter creates a fried "glue" that locks the wrap shut.
- Heat Distribution: Shredding the chicken into small bits ensures that every single piece is coated in cheese, so you don't get dry pockets of meat.
| Method | Time | Texture | Best For |
|---|---|---|---|
| Stovetop | 20 min | Shatter crisp | Maximum flavor and crunch |
| Oven | 25 min | Uniformly toasted | Cooking 6+ burritos at once |
| Air Fryer | 12 min | Dry crisp | Single servings |
Essential Component Analysis
I like to look at the ingredients not just as a list, but as roles in a play. Every part of this recipe is doing a specific job to make sure the end result is cohesive.
| Ingredient | Science Role | Pro Secret |
|---|---|---|
| Cream Cheese | Binding Agent | Let it reach room temp or it will leave lumps in your filling |
| Rotisserie Chicken | Protein Base | Use a mix of breast and thigh for better moisture |
| Sharp Cheddar | Flavor Punch | Grate it yourself; pre shredded cheese has potato starch that prevents a smooth melt |
| Smoked Paprika | Aroma Bridge | Adds a "grilled" flavor without needing an actual grill |
What You'll Need
Let's look at the gear. You don't need a fancy kitchen for this, just a few basics.
The Shopping List
- 3 cups (450g) shredded rotisserie chickenWhy this? Saves 1 hour of cooking and adds salty depth
- 4 oz (115g) cream cheese, softenedWhy this? Provides the creamy, stable popper texture
- 1 cup (115g) sharp cheddar cheese, shreddedWhy this? Stronger flavor means you need less for a big impact
- 1/2 cup (60g) diced jalapeñosWhy this? Fresh gives a crunch, pickled gives a tang
- 2 cloves (6g) garlic, mincedWhy this? Adds a sharp, savory baseline
- 1 tsp (5g) smoked paprikaWhy this? Gives it a woody, campfire aroma
- 1/2 tsp (3g) cuminWhy this? Essential earthy note for the burrito profile
- Salt to taste
- Black pepper to taste
- 6 large (10 inch) flour tortillasWhy this? Large enough to tuck the ends tightly
- 3 cups (450g) cooked cilantro lime riceWhy this? Adds bulk and a fresh, citrusy contrast
- 2 tbsp (30ml) butterWhy this? Better browning and richer taste than oil
Substitute Options
| Original Ingredient | Substitute | Why It Works |
|---|---|---|
| Cream Cheese | Mascarpone | Similar fat content. Note: Slightly sweeter, less tang |
| Sharp Cheddar | Pepper Jack | Melts similarly. Note: Adds more heat to the filling |
| Flour Tortillas | Corn Tortillas | gluten-free. Note: Must be steamed first or they'll crack |
| Rotisserie Chicken | Shredded Turkey | Leaner protein. Note: Needs a bit more butter for moisture |
If you're feeling fancy, you can add some black beans to the rice, but don't overdo it. Too many "chunks" in the burrito make it harder to roll and more likely to split.
Required Kitchen Tools
You don't need a stand mixer or a sous vide machine here. Keep it simple.
- Large Mixing Bowl: For blending the filling without making a mess.
- Cast Iron Skillet or Non Stick Pan: A cast iron is great for that deep mahogany sear, but non stick is safer for beginners.
- Spatula: For pressing the burritos down to ensure full contact with the pan.
- Chef's Knife: For dicing those jalapeños into small, uniform pieces.
Step by step Guide
Let's crack on. The process is straightforward, but the "tuck" is where most people mess up.
Creating the Molten Filling
- In a large mixing bowl, combine the softened cream cheese, shredded cheddar, diced jalapeños, and minced garlic. Note: Use a fork or hand mixer to get the cream cheese completely smooth first.
- Fold in the shredded rotisserie chicken, smoked paprika, and cumin. Stir until the chicken is completely enveloped in the cheese mixture and the texture is uniform and creamy.
Assembling the Burritos
- Lay a tortilla flat. Place a generous scoop of cilantro lime rice in the center, then top with about 1/2 cup (120ml) of the chicken popper mixture.
- Fold the sides inward and roll tightly, ensuring the ends are tucked in to prevent the cheese from escaping during the searing process. Note: If the tortilla resists, microwave it for 10 seconds to make it more pliable.
The Final Golden Sear
- Heat butter in a skillet over medium heat. Place the burritos seam side down in the pan.
- Press down lightly with a spatula. Cook for 2–3 minutes per side until the tortilla is mahogany colored and crisp.
Chef's Tip: To get an even more intense flavor, add a pinch of espresso powder to the chicken mixture. It doesn't taste like coffee, but it deepens the smokiness of the paprika.
Common Problem Fixes
Even the best of us have a burrito blowout. Usually, it's a physics issue, not a cooking issue.
Falling Apart Fixes
If your burrito splits, you likely overfilled it. A 10 inch tortilla has a limit. If you can't fold the sides comfortably, scoop out a tablespoon of filling. Another trick is to use a "glue" of water or a bit of cream cheese on the edge of the tortilla before rolling.
Filling Leak Prevention
Cheese leaks happen when the seam isn't sealed. Always start with the seam side down. If you see cheese escaping, immediately press down harder with the spatula to "weld" the tortilla shut.
Internal Heat Issues
Since the filling is mostly pre cooked, you're just reheating it. If the outside is burnt but the inside is cold, lower the heat to medium low and cook for an extra minute per side.
| Problem | Root Cause | Solution |
|---|---|---|
| Tortilla cracks | Cold tortilla | Microwave for 10-15 seconds before rolling |
| Bland filling | Under seasoned chicken | Add a squeeze of lime or more salt to the mix |
| Greasy exterior | Too much butter | Wipe the pan with a paper towel between batches |
The "No Fail" Checklist
- ✓ Tortilla warmed before rolling
- ✓ Filling mixed until no cream cheese lumps remain
- ✓ Seam side down in the pan first
- ✓ Medium heat (not high) to avoid burning the outside
Custom Flavor Variations
This recipe is a great canvas. Once you've mastered the basic Chicken Popper Burritos, you can start playing with the profile.
If you want something a bit more complex, try adding a layer of black beans and corn to the rice. For those who love a bit of sweetness, a thin spread of chipotle in adobo sauce on the tortilla before adding the filling creates a smoky, spicy contrast. If you're looking for something else to serve with chicken, my Chicken Ranch Quesadillas follow a similar creamy meets crispy logic.
For a lower carb version, you can use large collard green leaves or low carb wraps, though you'll lose that shatter crisp sear. If you want to swap the protein, shredded pork or even sautéed mushrooms and tofu work great with the popper filling.
Just make sure the substitute is dry; excess moisture is the enemy of the crunch.
Storage And Waste Tips
Don't let those leftovers go to waste. These actually hold up surprisingly well if you store them correctly.
Storage Guidelines Store your cooked burritos in an airtight container in the fridge for up to 3 days. To reheat, avoid the microwave if you can. The microwave makes the tortilla rubbery. Instead, toss them back in a dry skillet over medium heat for 3 minutes per side.
This brings back the crispiness.
Freezing Instructions You can freeze these for up to 2 months. Wrap each burrito tightly in foil, then place them in a freezer bag. Thaw in the fridge overnight before reheating in the oven at 180°C (350°F) for about 15 minutes.
Zero Waste Ideas Don't throw away the rotisserie chicken skin! I usually chop it up and fry it in a bit of oil until it's like a chip, then sprinkle it on top of the burritos for extra texture. If you have leftover cilantro lime rice, it makes a great base for a quick stir fry the next morning.
Best Side Pairings
A heavy, cheesy burrito needs something bright and fresh to balance it out. You don't want another "heavy" side.
I highly recommend serving these with a zesty salad or some roasted greens. My Roasted Broccoli recipe is the perfect match because the lemon garlic notes cut through the richness of the cream cheese.
If you're hosting a group, a simple platter of sliced radishes, pickled red onions, and a bowl of fresh salsa is all you need. The acidity of the lime and vinegar cleanses the palate between bites of the cheesy filling, making the whole meal feel less heavy.
Right then, you're all set. These Chicken Popper Burritos are all about that balance of creamy, spicy, and crispy. Just remember: seal that seam, don't overfill, and let the butter do its magic in the pan. Happy cooking!
High in Sodium
1100 mg 1,100 mg of sodium per serving (48% 48% of daily value)
The American Heart Association recommends a daily sodium limit of no more than 2,300 mg for most adults to maintain heart health.
Tips to Reduce Sodium
-
Swap Rotisserie Chicken-30%
Replace store-bought rotisserie chicken with home roasted or poached chicken breast to avoid high sodium processing brines.
-
Omit Added Salt-25%
Skip the 'salt to taste' entirely and use extra lime juice to brighten the flavors without adding sodium.
-
Lower Sodium Cheeses-15%
Use low-sodium cream cheese and a smaller amount of extra sharp cheddar, which provides more flavor with less volume.
-
Switch Tortilla Types-15%
Replace flour tortillas with corn tortillas or a low-sodium flour brand to reduce processed sodium.
-
Fresh Cilantro Lime Rice-10%
Ensure the rice is prepared from scratch using unsalted broth or water rather than using pre-seasoned mixes.
-
Boost Flavor with Spices
Increase the smoked paprika, cumin, and minced garlic to create a robust flavor profile without needing extra salt.
Recipe FAQs
Can I use fresh chicken instead of rotisserie?
Yes, provided it is already cooked. Shredded rotisserie chicken provides the ideal texture and flavor for the creamy filling.
How to stop the cheese from escaping during cooking?
Fold the sides inward and roll tightly. Tuck the ends in securely so the filling stays contained while searing.
Is it true that microwaving is the best way to reheat these?
No, this is a common misconception. The microwave makes tortillas rubbery, so use a dry skillet over medium heat for 20 minutes per side.
What is the best side dish for these burritos?
A crisp, acidic salad. These rich burritos pair perfectly with a fresh 10-minute side to cut through the creaminess.
How to achieve a crisp, mahogany colored tortilla?
Heat butter or oil in a skillet over medium heat. Press each burrito down lightly with a spatula for 2 3 minutes per side.
How long can I store these in the refrigerator?
Up to 3 days. Keep them in an airtight container to prevent the tortillas from drying out.
Can I freeze these for later?
Yes, for up to 2 months. Wrap each burrito tightly in foil before placing them in a freezer bag.
Chicken Popper Burritos

