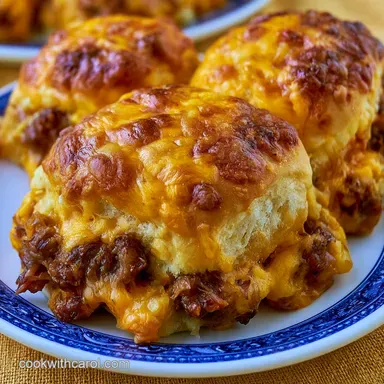
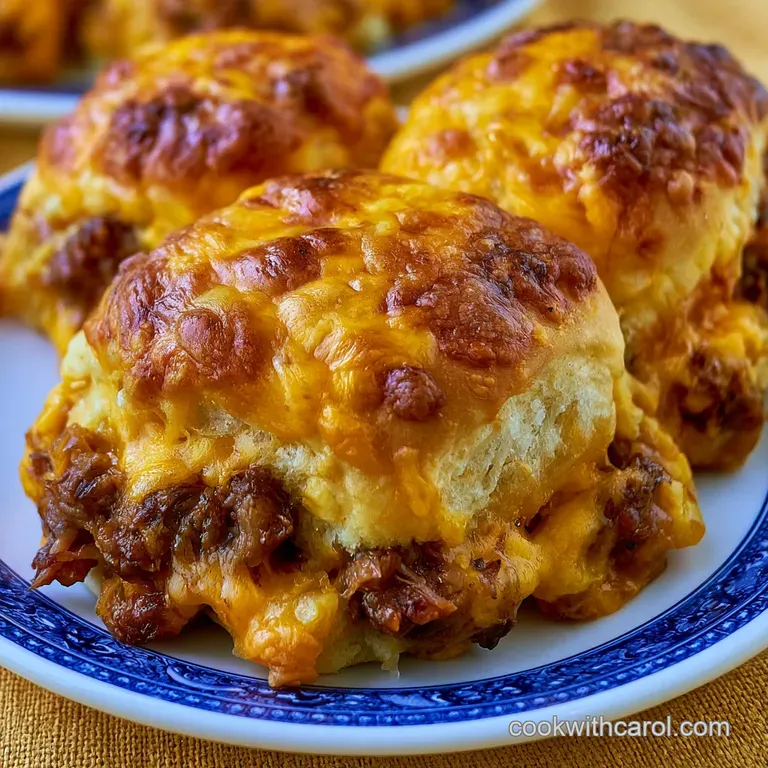
Sheet Pan Hawaiian Roll Cheeseburger Sliders
- Time:15 minutes active + 25 minutes cooking = Total 40 minutes
- Flavor/Texture Hook: Velvety melted cheese with a shatter crisp garlic butter top
- Perfect for: Game day food, party appetizers, or a quick crowd-pleasing dinner
- The Best Cheeseburger Sliders
- Secrets Behind The Flavor
- Component Analysis
- Ingredients
- Equipment Needed
- From Prep to Plate
- Avoiding Kitchen Disasters
- Troubleshooting Common Issues
- Make It Your Own
- Adjusting The Batch Size
- Busting Kitchen Beliefs
- Storage And Waste Tips
- Serving Suggestions
- Recipe FAQs
- 📝 Recipe Card
The Best Cheeseburger Sliders
Sizzle. That is the first thing you notice when the lean beef hits the hot oil. I remember the first time I made these for a group of friends during a chaotic football Sunday. I had originally planned to form twelve tiny, individual patties, but looking at the clock, I realized I was totally behind.
In a moment of desperation, I just dumped the meat into the pan and crumbled it all together. To my surprise, everyone actually preferred it that way. The meat stayed juicier, and there was no risk of one slider being overcooked while another was raw.
That day taught me that the best way to handle a crowd is to work smarter, not harder. These Cheeseburger Sliders aren't about precision; they are about that comforting, messy, salty sweet combination that makes a burger feel like a treat.
Instead of stressing over the "perfect" patty, we use a sheet pan approach that lets the oven do the heavy lifting. You get the same deep flavor but without the stress of flipping twelve mini burgers in a crowded pan.
When you pull the tray out of the oven, the aroma of toasted garlic and melted cheddar fills the room. It is an immediate mood lifter. I've spent a lot of time tweaking the sauce and the glaze to make sure every single bite has a bit of tang and a bit of crunch.
Trust me on this, the pickle juice in the sauce is the secret weapon that cuts through the richness of the beef and cheese. Let's get into how to make this actually work in your kitchen.
Secrets Behind The Flavor
Getting the balance right is what separates a soggy bun from a masterpiece. Here is the breakdown of why this method actually works.
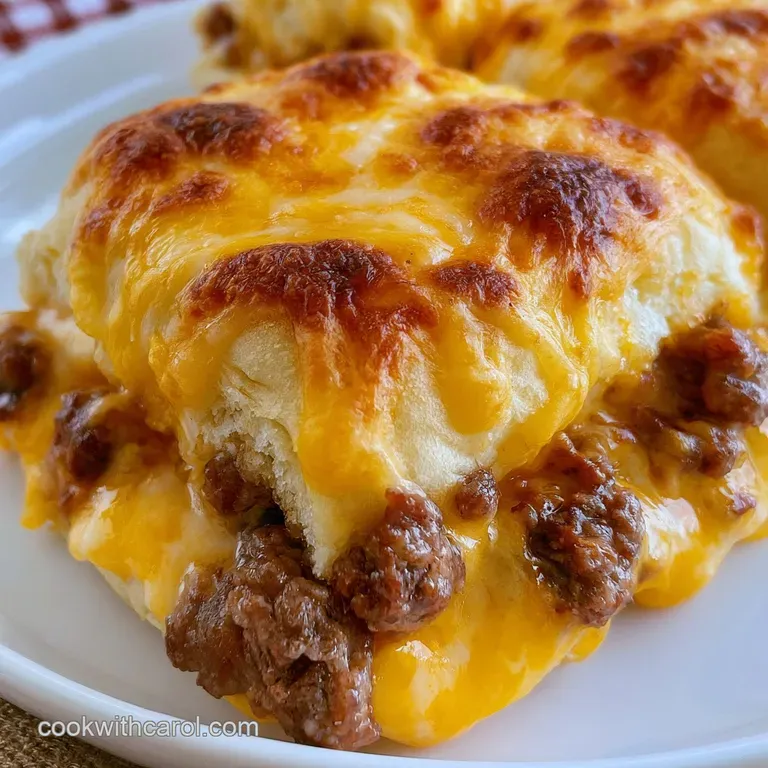
The Sugar Shield: The sweetness in Hawaiian rolls caramelizes under the broiler, creating a flavor bridge to the salty beef. This prevents the buns from tasting like plain bread.
Moisture Barrier: Layering the cheese directly on the meat creates a fat seal. This stops the beef juices from soaking straight into the bottom buns, which keeps things from getting mushy.
Surface Area: Crumbling the beef instead of making patties increases the contact points for the seasoning. You get more garlic and pepper in every single mouthful.
Steam Bake Effect: Baking the sliders as a connected slab traps a bit of steam between the rolls. This keeps the sides of the buns velvety and soft while the tops get crispy.
| Method | Prep Time | Texture | Best For |
|---|---|---|---|
| Fast (Crumbled) | 15 minutes | Uniform & Juicy | Big parties / Game day |
| Classic (Patties) | 30 minutes | Seared & Charred | Small groups / Gourmet feel |
The difference really comes down to how much time you have. If you're hosting a dozen people, the crumbled method is a lifesaver. If you're just feeding the kids, you might go the patty route, but the ease of the sheet pan is hard to beat.
Component Analysis
Understanding how each part of the Cheeseburger Sliders contributes to the final result helps you make better choices if you need to swap things out.
| Ingredient | Science Role | Pro Secret |
|---|---|---|
| Lean Ground Beef | Protein Base | Drain fat well so the buns don't get greasy |
| Hawaiian Rolls | Sweetness/Structure | Don't separate the rolls; slice the whole slab |
| Sharp Cheddar | Binding/Fat | Use pre sliced for even melting across the surface |
| Garlic Butter | Aromatics/Browning | Use melted butter to ensure every nook is coated |
I once tried using regular dinner rolls instead of the sweet ones, and honestly, it just didn't hit the same. The lack of sugar meant the garlic butter didn't caramelize as well, and the whole thing felt a bit flat. Stick to the sweet rolls for that authentic "party" taste.
Ingredients
For these Cheeseburger Sliders, you want ingredients that punch above their weight. Don't be tempted to use low-fat cheese - it won't melt into that velvety blanket we're looking for.
- 1 lb lean ground beef Why this? Less grease prevents soggy buns
- 1 tbsp olive oil
- 1 small yellow onion, finely diced
- 1 tsp garlic powder
- ½ tsp salt
- ½ tsp black pepper
- 1 pack Hawaiian sweet rolls Why this? Essential sweet salty contrast
- 6 slices sharp cheddar cheese
- 12 slices dill pickle chips
- 3 tbsp unsalted butter, melted
- 1 clove garlic, minced
- 1 tsp dried parsley
- ¼ cup mayonnaise Why this? Creamy base for the sauce
- 1 tbsp ketchup
- 1 tsp yellow mustard
- 1 tsp pickle juice Why this? Brightens the heavy fats
Simple Ingredient Swaps
| Original Ingredient | Substitute | Why It Works |
|---|---|---|
| Sharp Cheddar | Pepper Jack | Similar melt. Note: Adds a spicy kick |
| Hawaiian Rolls | Brioche Sliders | Richer taste. Note: Less sweetness, denser crumb |
| Lean Ground Beef | Ground Turkey | Leaner protein. Note: Drier result, needs more sauce |
| Yellow Mustard | Dijon Mustard | Stronger tang. Note: More sophisticated, slightly bitter |
If you're leaning toward a healthier version, the turkey swap is great, but you'll definitely want to be generous with that burger sauce to keep things moist. According to USDA FoodData, lean beef provides a dense hit of protein and iron, which is why it feels so satisfying.
Equipment Needed
You don't need a professional kitchen for this, but a few specific tools make it easier.
- 9x13 inch baking pan: This is the standard size for most Hawaiian roll packs.
- Large skillet: For browning the beef and onions.
- Pastry brush: Essential for getting the garlic butter evenly across the tops.
- Small whisk: To blend the burger sauce until it's silky.
- Spatula: For crumbling the meat and pressing it into the buns.
From Prep to Plate
Right then, let's get these Cheeseburger Sliders moving. The goal is to keep the assembly fast so the rolls don't sit and get stale before they hit the oven.
Searing the Beef
- Heat olive oil in a skillet over medium high heat.
- Add the ground beef and diced onions, cooking until the meat is browned and crumbled. Note: Don't over pack the pan or the meat will steam instead of sear.
- Stir in the garlic powder, salt, and pepper.
- Drain any excess fat thoroughly. Note: This is the most important step to avoid soggy bottoms.
Layering the Sheet Pan
- Slice the entire slab of Hawaiian rolls in half horizontally to create one large top and one large bottom.
- Place the bottom half in a 9x13 inch baking pan.
- Spread the cooked beef evenly across the bottom rolls.
- Layer the sharp cheddar cheese slices and dill pickle chips over the meat.
- Place the top roll slab back on.
The Two Stage Bake
- Whisk together the melted butter, minced garlic, and dried parsley.
- Use a pastry brush to coat the tops of the rolls evenly.
- Bake at 350°F (180°C) for 15 minutes until the cheese is bubbling.
- Increase heat or broil for the final 5 minutes until the tops are golden brown.
The Finishing Touch
- Mix mayonnaise, ketchup, yellow mustard, and pickle juice in a small bowl.
- Serve the Cheeseburger Sliders warm with a dollop of the sauce on the side or drizzled over the top.
Chef Note: If you're using a broiler for the last 5 minutes, stay right there and watch them. Those sugar rich buns can go from golden to burnt in about 30 seconds.
Avoiding Kitchen Disasters
Even a simple recipe can go sideways if you're not careful. The biggest enemy of these Cheeseburger Sliders is moisture.
Troubleshooting Common Issues
| Issue | Solution |
|---|---|
| Why Your Sliders Are Soggy | This usually happens because the beef wasn't drained properly or the buns were under baked. If you leave the rendered fat in the pan, it seeps into the bottom rolls, turning them into a sponge. |
| Why Your Buns Burnt | Because of the sugar content in the rolls and the butter, these brown incredibly fast. If your oven runs hot, skip the broiler and just bake them for an extra 2-3 minutes at 350°F (180°C). |
| Why Your Cheese Didn't Melt | This is often due to using "fat free" or "low moisture" cheese that doesn't have the necessary fats to liquefy. Stick to full fat sharp cheddar for that perfect pull. |
Common Mistakes Checklist
- ✓ Did you drain the grease? (Crucial for texture)
- ✓ Did you slice the rolls as a slab? (Saves time and keeps structure)
- ✓ Did you use melted butter? (Cold butter clumps and leaves gaps)
- ✓ Did you watch the broiler? (Prevents charred buns)
- ✓ Did you add pickle juice to the sauce? (Essential for acidity)
Make It Your Own
Once you've nailed the basic Cheeseburger Sliders, you can start playing with the flavors. I love changing these up depending on who is coming over.
Bacon Cheeseburger Twist
Fry up some chopped bacon and mix it directly into the beef crumble. The smoky flavor pairs perfectly with the sweetness of the buns. I usually add an extra teaspoon of black pepper to balance the richness.
Big Mac Style
Replace the cheddar with American cheese and double the amount of mustard in the burger sauce. You can even add a thin layer of shredded iceberg lettuce inside the sliders right before serving to get that classic fast food crunch.
Spicy Pepper Jack Swap
Use Pepper Jack cheese instead of cheddar and add a few diced jalapeños to the beef while it browns. This turns the Cheeseburger Sliders into a spicy treat that's great with a cold drink.
Lean Turkey Option
Swap the beef for ground turkey. Since turkey is leaner and can be bland, I recommend adding a splash of Worcestershire sauce to the meat while browning. It adds that "umami" depth that you lose when you skip the beef.
Adjusting The Batch Size
Depending on the crowd, you might need to scale these roll cheeseburger sliders up or down. It is not as simple as just doubling everything.
Scaling Down (Half Batch): If you only have a few people, use a smaller 8x8 inch pan. Reduce the baking time by about 20% since the heat penetrates a smaller mass faster. If you're using a single egg for a glaze (though we use butter here), beat it first and use half.
Scaling Up (2x-4x): When making multiple trays of Cheeseburger Sliders, work in batches. Don't crowd your oven too much, or the air won't circulate, and the buns won't crisp. For the seasoning, only increase the salt and spices to about 1.5x the original amount; otherwise, it can become overwhelming.
| Scale | Pan Size | Time Adjustment | Seasoning Note |
|---|---|---|---|
| 1/2 Batch | 8x8 inch | -5 minutes | Exact ratios |
| 2x Batch | Two 9x13 inch | +5 minutes | 1.5x salt/spices |
| 3x Batch | Three 9x13 inch | +10 minutes | 1.5x salt/spices |
If you're doing a massive party, you can actually assemble the trays a few hours early and keep them in the fridge. Just let them sit at room temperature for 20 minutes before baking so the cheese melts evenly.
Busting Kitchen Beliefs
There are a few things people tell you about sliders that just aren't true.
The Patty Myth: Some say you must use patties for "real" burgers. In the case of Cheeseburger Sliders, crumbling the meat actually provides a more consistent bite and ensures the cheese covers every single square inch.
The Toasting Myth: You might hear that you need to toast the buns before adding the meat. With this recipe, the butter glaze and the oven heat do that work for you. Toasting them first often makes the buns too hard, losing that velvety texture.
The Lean Beef Myth: While I suggest lean beef to avoid grease, some think 99% lean is best. Avoid this. You need at least some fat (like 80/20 or 90/10) for the beef to stay juicy during the two stage bake.
Storage And Waste Tips
If you actually have leftovers (which is rare), you have to store them correctly to keep them from turning into bricks.
Fridge Storage: Keep your Cheeseburger Sliders in an airtight container for up to 3 days. The buns will absorb some of the remaining moisture, so they stay relatively soft.
Freezing: You can freeze the assembled sliders before baking. Wrap them tightly in foil and freeze for up to 2 months. Bake them from frozen, just add about 10 minutes to the initial baking time.
- Zero Waste
- - Leftover Sauce
- Use the burger sauce as a dip for sweet potato fries or as a spread for a turkey sandwich.
- - Beef Scraps
- If you have a bit of beef crumble left over, throw it into a bowl of pasta or use it to top a baked potato.
- - Onion Ends
- Save your onion scraps and garlic peels in a freezer bag to make a quick vegetable stock later.
Serving Suggestions
To make these Cheeseburger Sliders a full meal, you need sides that contrast with the richness of the cheese and butter.
I love serving these with a side of crisp, vinegar based coleslaw. The acidity cleanses the palate between bites. If you want something heartier, a pile of seasoned potato wedges or a simple Caesar salad works brilliantly.
For drinks, keep it classic. A cold cola or a crisp lager cuts through the fat of the beef. If you're hosting a game day event, set the sliders on a large wooden board with bowls of extra burger sauce, additional pickle chips, and maybe some sliced red onions for people to add their own toppings.
When you present them, leave them in the pan for a few minutes to set, then slice them into individual squares. This gives you those clean edges that look great on a platter. Trust me, the moment you pull those individual Cheeseburger Sliders apart and see the melted cheese stretching, your guests are going to be impressed.
Right then, you've got everything you need. These roll cheeseburger sliders are a total crowd pleaser and take way less effort than they look. Just remember to drain that beef, watch your broiler, and don't skimp on the pickle juice. Happy cooking!
Recipe FAQs
Can I freeze these sliders?
Yes, freeze them before baking. Wrap the assembled sliders tightly in foil for up to 2 months and add 10 minutes to the initial baking time.
Why are the bottom buns soggy?
The beef was not drained properly. Rendered fat that isn't removed seeps into the bottom rolls, turning them into a sponge.
How to prevent the rolls from burning?
Skip the broiler. Bake the sliders for an additional 2-3 minutes at 350°F (175°C) instead, as the sugar in the rolls and butter causes them to brown quickly.
Is it true I can put raw beef directly on the rolls and bake everything together?
No, this is a common misconception. The beef must be browned and drained in a skillet first to ensure it is cooked through and the rolls stay crisp.
How to prepare the burger sauce?
Whisk mayonnaise, ketchup, yellow mustard, and pickle juice in a small bowl until well combined.
Can I store leftover sliders in the refrigerator?
Yes, for up to 3 days. Keep them in an airtight container to prevent the buns from hardening.
Why didn't my cheese melt properly?
You likely used fat-free cheese. Standard sharp cheddar melts much more effectively than fat-free alternatives.
Hawaiian Roll Cheeseburger Sliders