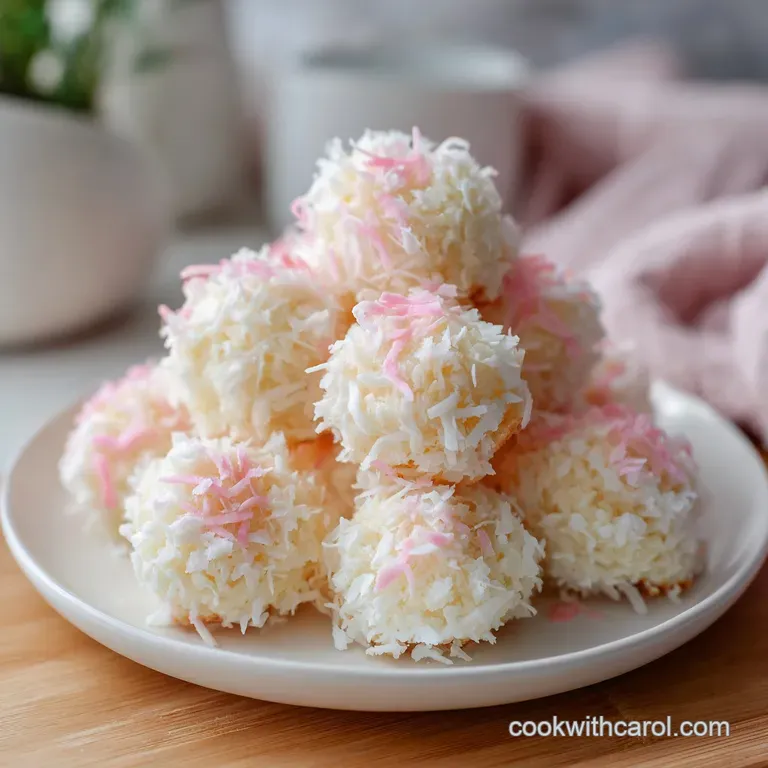
Fluffy No-Bake Easter Bunny Coconut Tails
- Time:15 minutes active + 30 minutes chilling = Total 45 minutes
- Flavor/Texture Hook: Velvety white chocolate with a snowy, chewy coconut center
- Perfect for: Kid friendly Easter parties or last minute holiday dessert platters
Make No Bake Easter Bunny Coconut Tails Treat
Imagine the smell of sweet, toasted coconut filling your kitchen, but then you realize your "treats" are actually just sticky puddles on a plate. I've been there. A few years back, I tried a similar recipe where I skipped the chilling step because I was in a rush, and my cute bunny tails turned into sad, flat coconut pancakes the second they hit the warm chocolate.
It was a total disaster, and I almost gave up on no bake coconut sweets entirely.
But here is the thing - the secret isn't in the ingredients, it's in the temperature. Learn how to make the ultimate No Bake Easter Bunny Coconut Tails Treat by respecting the freeze. When you get that cohesive, tacky dough and let it firm up in the fridge, the result is a treat that actually holds its shape.
You get a center that is chewy and rich, wrapped in a shell that has just the right amount of snap.
We're going for a look that's totally "snowy" and cute. These aren't just sweets; they're little edible decorations for your Easter spread. Trust me, once you see how easily these come together, you'll be making them every spring. Let's get into how we actually get these to stay round and velvety.
The Secret to the Shape
To get these to work, we have to deal with the way coconut and sugar interact. It's not about cooking; it's about stability.
The Glue Factor: Sweetened condensed milk acts as a heavy syrup that binds the coconut flakes together. Because it's so thick, it prevents the balls from crumbling.
Thermal Shock: Chilling the coconut balls before dipping them into warm chocolate creates a "flash set." This means the chocolate hardens almost instantly, preventing the center from melting or sagging.
Moisture Control: The shredded coconut absorbs the liquid from the milk. If you use too much milk, they'll be mushy, but the right ratio creates a dough that's easy to roll.
| Servings | Ingredient Adjustments | Pan Size | Chill Time |
|---|---|---|---|
| 12 pieces | Standard (as listed) | Small Sheet | 30 minutes |
| 24 pieces | Double everything | Large Sheet | 30 minutes |
| 36 pieces | Triple everything | 2 Medium Sheets | 35 minutes |
This serving size guide helps you plan for bigger crowds. Just remember that if you double the batch, you'll need more room in your fridge so the baking sheets aren't stacked on top of each other.
Selecting Your Base Elements
When you're picking your ingredients, don't just grab the first thing you see. The texture of the coconut makes a massive difference in how the "tails" feel in your mouth.
| Ingredient | Science Role | Pro Secret |
|---|---|---|
| Shredded Coconut | Structural Base | Use a brand with consistent flake size for smoother balls |
| Condensed Milk | Binding Agent | Room temperature milk mixes more evenly into the coconut |
| White Chocolate | Protective Shell | Use wafers instead of bars to avoid seizing |
| Desiccated Coconut | Final Texture | This finer powder gives that "snowy" look without being chunky |
For the shredded coconut, make sure it's the sweetened variety. The sugar in the coconut helps the condensed milk grip the flakes. If you're looking for other no bake options for your party, you might like my no bake cheesecake for a creamier contrast.
Essential Kitchen Tools
You don't need a fancy kitchen to pull this off, but a few specific tools make the process way less messy.
- Large Mixing Bowl: You need plenty of room to stir without the coconut flying everywhere.
- Parchment Paper: This is non negotiable. The coconut balls are tacky, and they will stick to a bare pan.
- Microwave Safe Bowl: For the chocolate. Glass is best because it holds heat longer.
- Spatula: A silicone one is great for scraping every bit of that condensed milk out of the can.
- Small Plate: For the desiccated coconut coating.
Chef's Note: If you don't have a microwave, you can melt the chocolate using a double boiler (a bowl over simmering water), but be extremely careful not to let a single drop of water touch the chocolate, or it will clump up instantly.
Step by step Assembly

Let's get these moving. The goal is efficiency so we can get them into the fridge as fast as possible.
- Combine the base. In your large bowl, mix 2 cups (198g) of sweetened shredded coconut, 1/2 cup (155g) of sweetened condensed milk, and 1 tsp (5ml) of vanilla extract. Stir with your spatula until the mixture is fully saturated and forms a tacky, cohesive dough.
- Shape the tails. Scoop about 1 tablespoon of the mixture. Roll it between your palms to create smooth, round spheres. Note: Wet your palms slightly if the dough sticks to your skin.
- Arrange and set. Place the balls on your parchment lined baking sheet. Refrigerate for 30 minutes until the balls feel firm to the touch.
- Melt the shell. Put 4 oz (115g) of white chocolate melting wafers in your bowl. Heat in 30 second bursts, stirring in between, until the chocolate is glossy and smooth.
- Add the color. If you want that cute pink accent, take a small scoop of the melted chocolate into a separate cup and stir in 1 drop (0.5ml) of pink gel food coloring.
- The first dip. Take a chilled coconut ball and dip the bottom half into the pink chocolate.
- The second dip. Dip the top half into the white chocolate.
- The snowy finish. Immediately roll the wet chocolate tails in 1/2 cup (50g) of desiccated coconut.
- Final set. Let them sit at room temperature for 10 minutes until the shell is hard and doesn't smudge.
Fixing Common Texture Issues
Even with a plan, things can go sideways. Most issues with this recipe come down to moisture or temperature.
Troubleshooting Common Issues
| Issue | Solution |
|---|---|
| Why Your Mixture Is Too Sticky | If the dough feels like glue and won't roll into a ball, you've likely got too much condensed milk or your coconut was too fine. Don't panic. Just stir in an extra tablespoon of shredded coconut at a |
| Why Your Chocolate Clumped | White chocolate is temperamental. If it looks grainy or has lumps, it's likely "seized" because it got too hot or a drop of water got in. You can sometimes save it by adding a tiny bit of coconut oil |
| Why the Tails Flattened | This happens if the balls weren't chilled long enough. The warm chocolate melts the exterior of the coconut ball, and gravity does the rest. Always ensure they've had their full 30 minutes in the frid |
Fun Flavor Twists
Once you've nailed the basic version, you can start playing with the flavors. This is where you can make these really your own.
The Zesty Bunny: Add the zest of one lime to the coconut mixture. The acidity cuts through the sweetness of the condensed milk and makes it taste like a tropical vacation.
Coffee Kick: Mix 1 teaspoon of instant espresso powder into the melted white chocolate. It creates a "mocha coconut" vibe that adults will actually love.
Surprise Center: Press a single dried cranberry or a tiny piece of dark chocolate into the center of the ball before rolling. It adds a burst of flavor when you bite in.
If you're avoiding sugar for your holiday treats, you might want to check out these sugar free cheesecake bars as a healthier alternative to the traditional coconut sweets.
Storage and Freshness
Because these use condensed milk and chocolate, they don't like sitting out in a warm room. They'll lose their shape and the chocolate can start to "sweat."
Fridge Storage: Keep your tails in an airtight container in the fridge for up to 7 days. This keeps the center chewy and the shell crisp.
Freezing: You can freeze these for up to 2 months. Place them on a tray to freeze individually first, then move them to a freezer bag. This prevents them from sticking together in one giant coconut clump.
Reheating: Do not reheat these! Just let them sit at room temperature for 10-15 minutes before serving.
Zero Waste Tip: If you have leftover desiccated coconut, don't toss it. Mix it into your morning oatmeal or use it to crust the bottom of a homemade granola bar. If you have a bit of melted chocolate left, drizzle it over some fresh strawberries for a quick snack.
Great Drink Pairings
Since these treats are very sweet and rich, you want a drink that cleanses the palate.
- Cold Brew Coffee: The bitterness of a strong cold brew balances the sugary punch of the condensed milk.
- Hibiscus Tea: An iced, tart hibiscus tea provides a floral contrast to the creamy coconut.
- Sparkling Water with Lime: A simple, bubbly drink with a squeeze of lime cuts through the fat of the white chocolate.
When plating these, I like to put them on a light blue or pastel yellow platter. The white "snowy" coconut really pops against those colors. You can even scatter a few fresh mint leaves around the plate to give it a fresh, spring look.
According to Serious Eats, the way fats like those in coconut and cocoa butter behave at different temperatures is why the chilling step is so vital for structural integrity in no bake desserts. By controlling that temperature, you ensure your bunny tails stay perfectly round and velvety from the first bite to the last.
Recipe FAQs
Can I make these treats in advance?
Yes, they store well in the fridge. Keep them in an airtight container for up to 7 days. If you enjoy this style of make-ahead prep, you'll like how we handle overnight oats for a creamy breakfast.
Why is my coconut mixture too sticky to roll?
Stir in an extra tablespoon of shredded coconut. This usually happens if there is too much condensed milk or the coconut is too fine to absorb the liquid properly.
How to melt white chocolate without burning it?
Microwave in 30-second bursts. Stir the wafers between each interval until the chocolate is glossy and smooth to prevent scorching.
Is it true that white chocolate requires a double boiler to melt?
No, this is a common misconception. Using a microwave in short bursts is faster and works perfectly for melting wafers.
How to roll the coconut balls without them sticking to my hands?
Wet your palms slightly. This prevents the tacky dough from adhering to your skin while you shape the spheres.
Do I really need to refrigerate the balls before dipping?
Yes, chill them for 30 minutes. This ensures the coconut balls are firm enough to maintain their shape when they hit the warm melted chocolate.
Can I freeze these treats for later?
Yes, they freeze for up to 2 months. Place them on a tray to freeze individually first, then transfer them to a freezer bag to prevent them from clumping together.
No Bake Bunny Coconut Tails